Best Practices for Weather Data Integration
Integrating real-time weather data into farm management apps can help farmers make better decisions directly in the field. From precise spray timing to irrigation planning, localized weather insights reduce risks like overwatering or poor chemical application. Here's a quick summary of how to integrate weather data effectively:
- Define Use Cases: Match specific weather variables (e.g., wind speed, soil temperature) to farming tasks like planting or pest control.
- Choose Reliable Sources: Use APIs like the National Weather Service (NWS) for accurate, field-specific data.
- Validate Data: Set up range and consistency checks to ensure accuracy.
- Optimize API Integration: Use caching, asynchronous programming, and GPS precision to improve app performance, even in low-connectivity areas.
- Design User-Friendly Displays: Show only relevant metrics (e.g., wind speed for spraying) in clear, actionable formats.
- Automate Weather Logging: Attach weather data to job records for better tracking and analysis.
- Ensure Security: Protect API keys and use secure data transmission methods.
Integrate Weather Data Using Farmonaut API | Comprehensive Tutorial
Define Weather Use Cases and Data Requirements
Essential Weather Variables for Farm Management Tasks
To effectively integrate weather data into farm management, start by identifying specific tasks like spray timing, irrigation, or equipment operation where weather conditions play a critical role. This step ensures that the right weather variables are matched to each activity, laying the groundwork for smarter decision-making.
Identify Farm Management Use Cases
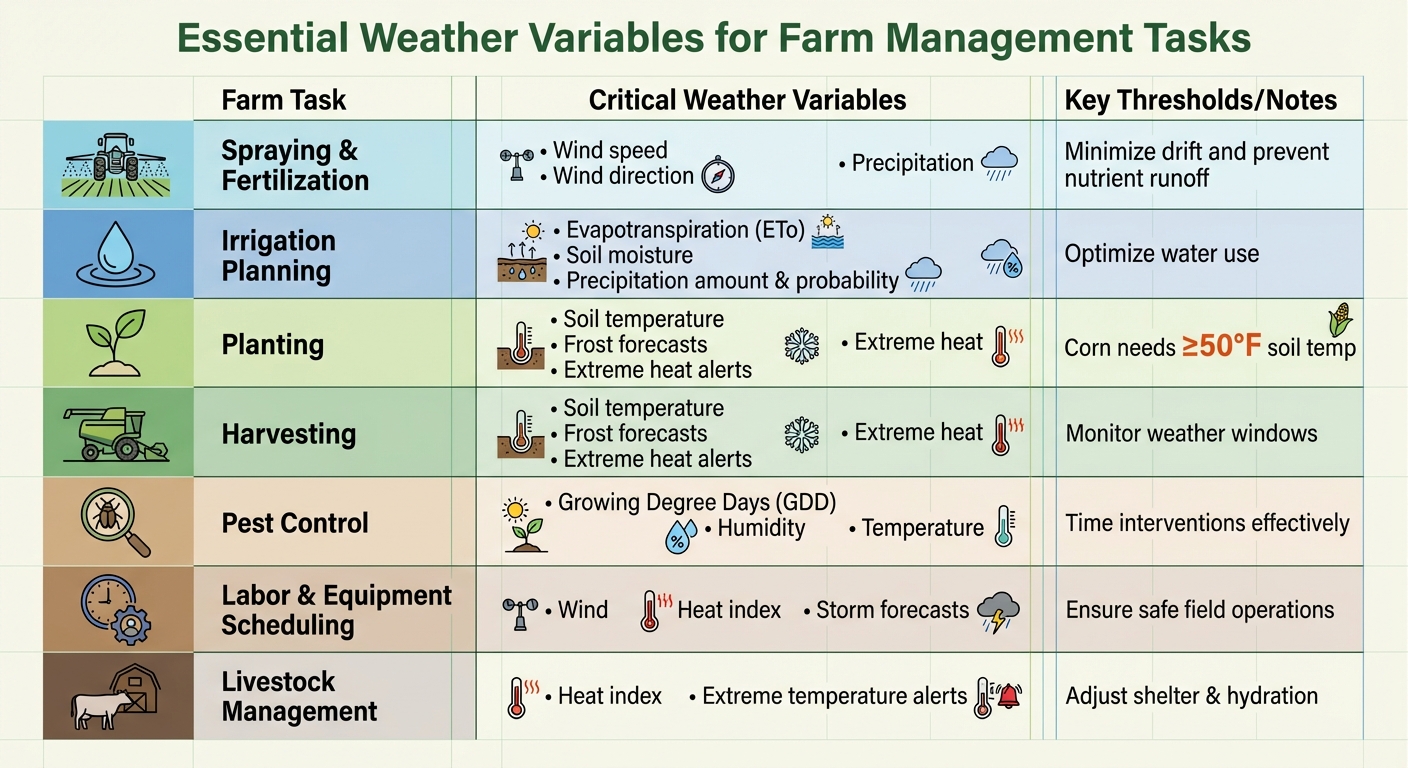
Weather data isn't one-size-fits-all - each operation has unique needs. For tasks like spraying and fertilization, tracking wind speed, wind direction, and precipitation is crucial to minimize drift and prevent nutrient runoff. Irrigation decisions benefit from pairing evapotranspiration (ETo) with soil moisture levels to optimize water use. Planting and harvesting require monitoring soil temperatures and forecasts for frost or extreme heat. Pest control can be guided by Growing Degree Days (GDD) and humidity to time interventions more effectively.
For example, corn typically needs soil temperatures of at least 50°F before planting. Labor and equipment scheduling relies on short-term forecasts for wind, heat, or storms to ensure safe and efficient field operations. Livestock management also depends on weather data, with heat index and extreme temperature alerts helping farmers decide when to provide extra shelter or adjust hydration protocols.
List Required Weather Variables
Once you've mapped out your use cases, identify the specific weather parameters needed for each workflow. For instance:
- Air temperature (°F): Essential for growth models, frost protection, and worker safety.
- Precipitation: Includes amount (in inches), intensity, and probability - key for irrigation planning and determining field accessibility.
- Wind speed and direction (mph): Critical for spray applications, typically measured at a height of 10 meters.
- Soil temperature and moisture: Guides planting schedules and irrigation needs.
- Solar radiation and relative humidity: Used to calculate evapotranspiration and monitor pest risks.
For immediate decisions, hourly weather data is ideal, while 30-year climatic normals are better suited for long-term planning. The National Digital Forecast Database (NDFD) offers hourly updates on temperature, wind, and humidity across the Continental U.S., with precipitation forecasts available in 6-hour or 12-hour increments.
Accuracy matters, especially in precision farming. While large-scale weather patterns can be reliable within a 60-mile range, precision agriculture requires data from within a 6-mile radius. This highlights the importance of using field-specific GPS coordinates rather than relying on general area forecasts when pulling data from weather APIs.
Select and Validate Weather Data Sources
Choosing the right weather data provider is key to offering accurate and reliable insights. The National Weather Service (NWS) API is a great option, providing free access to forecasts, alerts, and observations through api.weather.gov. Its data is issued on a 2.5km grid, which effectively covers agricultural regions across the United States. For those needing historical data, Climate Data Online (CDO) offers daily and monthly records of temperature and precipitation for free, though you’ll need to register for an access token. Additionally, private providers can supply highly precise and localized forecasts, covering billions of locations. These resources form the foundation for integrating reliable weather data into your farm management tools.
Evaluate Weather APIs and Stations
When evaluating weather APIs, station density in your target farming areas is an important consideration. Networks like ASOS (Automated Surface Observing Systems), COOP (Cooperative Observer Program), and private weather stations can provide valuable coverage. The NWS API offers coordinate precision up to four decimal places - roughly 30 feet or 10 meters - making it suitable for field-specific operations. It’s also crucial to ensure your provider uses U.S. standard units - temperature in °F, precipitation in inches, and wind speed in mph - to avoid conversion issues with farm equipment. For time-sensitive activities like chemical spraying, look for APIs that provide hourly updates, as NDFD forecasts for temperature and wind refresh every hour across the Continental U.S..
Accuracy is just as important as coverage. Independent audits, such as those conducted by ForecastWatch, can help you compare providers based on metrics like precipitation, temperature, cloud cover, and wind accuracy. However, keep in mind that MADIS observations might have delays of up to 20 minutes due to quality control processes.
Set Up Data Validation Checks
After selecting a data source, rigorous validation processes ensure the delivery of accurate and actionable information. Start with range checks based on meteorological rules to filter out impossible values. For example, the NDFD standard suggests using Wind Chill for apparent temperatures at or below 50°F and Heat Index for those above 80°F. Implement consistency checks to flag anomalies, such as precipitation levels that don’t align with cloud cover or wind speeds that contradict storm warnings. If primary data is missing, follow NWS best practices by leaving gaps unfilled to avoid introducing bias.
"Assuring data quality from the point of observation to the point of delivery is critical." - National Weather Service
To optimize performance, cache location lookups to reduce latency and server strain. Always include a unique User-Agent header with contact details in your API requests to prevent 403 errors and allow providers to contact you about security concerns. For APIs with rate limits - such as CDO’s five requests per second and 10,000 requests per day - build throttling mechanisms into your system to prevent interruptions. Finally, if you rely on specific weather stations, verify their relocation history. Even small moves, like a 100-foot vertical change or a 5-mile horizontal shift, can significantly impact climate records and distort your farm data.
Implement API Integration and Performance Practices
Once you've chosen reliable data sources and set up validation checks, it's time to focus on integration strategies that ensure smooth and efficient mobile operations. Strong API integration tackles common challenges like unstable connectivity and battery limitations in the field. A good starting point is to use exponential backoff for failed requests. If you hit 4XX or 5XX errors, gradually increase the delay between retries to avoid overloading the server. Another essential step is enabling GZIP compression (Accept-Encoding: gzip), which can significantly reduce the size of API responses.
Be mindful of when you schedule API calls. Avoid predictable patterns, like always making requests at the top of the hour (:00 or :30), as these can lead to traffic spikes and increased latency. Instead, randomize refresh times - for example, set them to :13 or :22 past the hour. Additionally, when working with GPS coordinates for field boundaries, make sure to percent-encode special characters like spaces (%20) or hashtags (%23) to comply with URI standards. These practices, combined with earlier data validation efforts, help maintain reliable mobile performance even in unpredictable field conditions.
Build API Integration for Mobile Conditions
Field operations often involve weak or spotty connectivity, so your integrations need to be prepared for these challenges. Use asynchronous programming to keep your app responsive while waiting for API responses. Implement a circuit breaker pattern to halt requests to a failing service temporarily, preventing the app from freezing or crashing. For GPS mapping, adjust coordinate precision based on your needs - whether you're covering large drive boundaries or smaller areas under 20 acres.
Pay attention to the API's "Expires" header to determine when data should be refreshed. For example, the Weather Company's Current Conditions API usually specifies a max-age of 600 seconds (10 minutes), allowing you to reuse cached data within that timeframe. If certain features, like MinuteCast, aren't available for a location, cache the HTTP 400 error response for up to 72 hours. This avoids repeated failed calls that drain both battery life and data.
"To reduce data consumption and prolong battery life in some devices, we recommend that developers cache MinuteCast™ HTTP 400 responses for 72 hours to prevent subsequent requests from returning the error."
– AccuWeather
Optimize Performance, Caching, and Costs
Smart API integration naturally leads to better caching and lower costs. Reducing response payloads is a game-changer for mobile performance. Use the fields= parameter to request only the data you need, cutting file sizes by more than 95%. Similarly, the plimit= parameter can limit forecast intervals, saving both bandwidth and processing time.
For geographic queries, round coordinates to two decimal places - this gives roughly 1.1 km (0.68 miles) precision, which is often sufficient. This approach standardizes queries, improves cache hit rates, and avoids unnecessary precision. Design your app with a shared data layer that allows multiple UI components to use a single API response, eliminating redundant requests for the same data. To ensure functionality during outages, store weather data locally for 15–30 minutes.
By applying these optimizations, platforms like HarvestYield ensure that weather data remains accessible and dependable, even in tough conditions.
"By reducing variability [in coordinate precision], developers improve cache utilization and speed up responses – especially at scale."
– Matthew Porcelli, Lead Sales Engineer, The Weather Company
Transform Your Agricultural Team
Streamline job management, field mapping, and machine tracking with HarvestYield. Simplify your operations and eliminate paper job sheets.
ContinueDesign Weather UX and Data Logging for Farm Operations
After setting up your API integration, the next step is to focus on creating user-friendly weather displays and automating data logging. A well-thought-out interface highlights the most critical information, while automated logging removes the need for manual entries, ensuring data accuracy across all records. This approach not only simplifies day-to-day fieldwork but also establishes a solid foundation for capturing detailed data during and after operations.
Display Weather Data in Farm Workflows
The interface should align with the natural flow of field operations. Weather data must be displayed in standard U.S. imperial units to avoid confusion and support quick decision-making, especially during time-sensitive tasks like spraying or planting.
Prioritize the metrics that matter most for specific tasks. For instance, spraying crews need wind speed and gust information readily available, while planting teams depend on soil temperature and precipitation data. Keep the interface streamlined by showing only the essential details. Weather information should be integrated into job or field-specific views, reducing the need for operators to switch between screens. Add descriptive icons, such as "Cloudy" or "Scattered snow showers", to provide immediate visual context.
Here’s a quick breakdown of key weather metrics and their applications:
| Weather Variable | U.S. Unit | Operational Use Case |
|---|---|---|
| Temperature (Min/Max/Mean) | °F | Cold protection and planting decisions |
| Wind Speed & Gusts | mph | Spraying safety and preventing chemical drift |
| Precipitation & Rain Sum | inches | Adjusting irrigation and assessing field access |
| Evapotranspiration (ET) | inches | Fine-tuning irrigation schedules |
Log Weather with Jobs, Fields, and Equipment
Automating weather data logging at the start and end of each job can save time and improve accuracy. By linking this data to field IDs, GPS boundaries, and equipment tags, you create a seamless record-keeping system.
Platforms like HarvestYield make this process easier by recording job start and end times with GPS coverage and automatically attaching weather data to each record. Weather data can also be logged alongside machine activities, refueling, servicing, and production details. Use precise timestamps in ISO 8601 format to ensure consistency and maintain accurate historical records.
For compliance purposes, verify that data sources or on-farm sensors meet accuracy standards, such as ±1°F for air temperature and ±3% for relative humidity below 90% RH. Access to historical weather data, like that available from services such as Leaf (dating back to 1940), can provide long-term insights and support regulatory compliance. By combining real-time weather displays with automated logging, you create a system that delivers both immediate operational benefits and valuable historical data for future analysis.
Ensure Security, Compliance, and Maintainability
Keeping your weather integration secure is essential for safeguarding farm data and controlling API costs. Poor data handling or exposed API keys can lead to unauthorized access and privacy issues. At the same time, building a system that can evolve with changes in weather services or operational requirements ensures long-term functionality.
Protect API Keys and User Data
Never hardcode API keys directly into your app's source code or commit them to version control. Instead, store these keys on a secure backend server and use temporary access tokens for communication with weather services. For mobile apps, implement OAuth 2.0 with the PKCE (Proof Key for Code Exchange) extension to prevent unauthorized interception of authorization codes.
Limit how API keys are used by applying restrictions, such as tying them to specific IP addresses for server-side integrations, SHA-1 certificate fingerprints for Android apps, or Bundle IDs for iOS apps. Regularly rotate and deactivate old keys to minimize risks.
Always ensure that weather data is transmitted securely by using TLS 1.2 or higher (HTTPS). This protects sensitive details, like GPS coordinates and user credentials, from being exposed during data transmission. These measures not only secure your integration but also support efficient and reliable operations.
Monitor, Test, and Maintain Integrations
Once your API keys and data are secured, ongoing monitoring and testing are crucial to ensure everything runs smoothly. Keep an eye on API usage weekly to spot unusual traffic spikes. Test your integration under challenging conditions, such as low connectivity or API timeouts, to identify potential issues early. Be proactive in updating your code whenever weather service providers modify or deprecate their endpoints.
For failed requests, use exponential backoff to prevent overwhelming the API. Additionally, avoid scheduling automated scripts to run precisely on the hour - randomizing their timing helps reduce redundant calls, especially since most observation stations update hourly. Fetching data too frequently, like every five minutes, can lead to unnecessary costs without adding value.
To optimize performance, use field filtering parameters to minimize payload sizes. As weather services evolve, regularly review and refine your integration code to align with any updates or changes.
Conclusion
Bringing weather data into farm management applications isn't just a technical task - it’s a critical part of making decisions that can safeguard your profits. As Clyde W. Fraisse from the University of Florida aptly states: "The only thing worse than no data is wrong data".
By following key steps - like defining your use cases, verifying data sources, optimizing API performance, and ensuring strong security - you can create a solid weather integration system. This system empowers better decision-making, whether it’s scheduling irrigation, planning spray applications, or shielding crops from frost. With nearly 90% of business leaders recognizing how daily weather impacts their operations, the stakes are even higher in agriculture, where weather-related risks can carry billion-dollar consequences.
Accurate weather integration doesn’t just inform decisions - it delivers measurable benefits. For example, precise sensor data can mean the difference between efficient irrigation and wasted resources. Regular upkeep, such as checking sensors weekly, validating data against nearby stations, and keeping an eye on API performance, ensures your system stays dependable and up-to-date.
FAQs
How can I make sure the weather data in my farm management app is accurate?
To get precise weather data for your farm management app, the first step is choosing a dependable provider known for accurate forecasts. Look for one that excels in predicting temperature, precipitation, wind, and cloud cover. Combine this data source with a well-designed API that prioritizes best practices, like effective error handling and request management. This reduces the chances of outdated or inaccurate information slipping through.
If you’re using on-site weather stations, there are a few key steps to follow. Make sure the equipment meets sensor accuracy standards and is installed according to National Weather Service (NWS) guidelines. Regular maintenance is a must - this includes proper sensor placement, routine calibration, and cleaning. Keeping a detailed calibration log can help you spot and fix inconsistencies in your data.
By syncing verified weather data with HarvestYield, you can automate timestamping and geotagging for each reading. This setup also allows you to cross-check for discrepancies and flag unusual data points. With accurate metrics like temperature (°F), precipitation (inches), and wind speed (mph), you’ll have the insights needed to make timely and well-informed decisions for your farm operations.
How can I integrate weather APIs into farm management apps for areas with poor connectivity?
To provide dependable weather data in areas with limited connectivity, consider adopting an offline-first approach. This means caching the most recent weather data directly on the device, allowing users to access information even when there's no active internet connection. Additionally, use a fallback weather provider to retrieve data when the primary API isn't available. This ensures forecasts remain accessible at all times.
To optimize performance and reduce costs, compress data transfers and stagger refresh intervals across devices. This prevents network overload and keeps data usage efficient. Implement smart caching practices, such as using expiration headers, so valid forecasts can be reused instead of repeatedly fetching the same information. Whenever possible, take advantage of batch endpoints or server-pushed updates to cut down on unnecessary traffic.
For apps like HarvestYield, storing essential weather metrics - such as temperature (°F), precipitation (inches), and wind speed (mph) - locally with a timestamp ensures field crews can make informed decisions, even offline. By integrating these techniques, your app stays efficient, reliable, and easy to use, even in areas with unreliable connectivity.
What weather data should I use for different farming tasks?
The secret to choosing the right weather data lies in tailoring it to the specific farming task at hand. For planting or preparing seedbeds, prioritize temperature (°F) and the risk of frost, while humidity plays a role in evaluating seedling emergence. When it comes to irrigation planning, focus on precipitation (inches), temperature, solar radiation, wind speed (mph), and humidity to manage water usage effectively. If you're applying pesticides or fertilizers, keep an eye on temperature, humidity, wind speed and direction, and dew point to limit issues like drift and evaporation. For harvesting, rely on short-term forecasts for temperature, rain chances, and wind gusts to avoid weather-related setbacks or equipment damage.
To make this process easier, start with a simple checklist tailored to each task and invest in sensors that provide accurate measurements of the key variables. Tools like HarvestYield can streamline this effort by automatically linking relevant weather data - such as temperature, rainfall, and wind conditions - to each field operation. This automation not only ensures precise record-keeping but also reduces extra work. By aligning weather insights with your farming activities, you can enhance decision-making, boost yields, and cut down on waste.