5 Steps for Client Onboarding in Farm Management
If onboarding is loose, farm software use slips fast. I’d keep it simple: collect the right intake details, follow a quick start guide to set up the account right, clean the data before import, train people by role, and check usage at 30, 60, and 90 days.
Here’s the whole process in plain English:
- Step 1: Intake Gather farm size, location, users, current records, busy seasons, and main pain points.
- Step 2: Setup Add clients, fields, users, permissions, and farm details with the right U.S. formats like acres, miles, USD ($), and °F.
- Step 3: Data move Clean duplicates, fix field names, verify mapped acres, and usually bring over only the last 1 to 3 seasons.
- Step 4: Training Train each person based on daily work, not one big session for everyone. Go live outside planting and harvest when possible.
- Step 5: Review Track active users, digital job logging, field record completion, and invoicing speed during the first 60 to 90 days.
A few points stand out fast:
- Wrong field-to-client links can throw off jobs, reports, and invoices
- Acreage gaps above 1% to 3% should be checked before import
- By 90 days, teams often aim for 90%+ user adoption
- Better setup and self-service can cut manager support calls by up to 90%
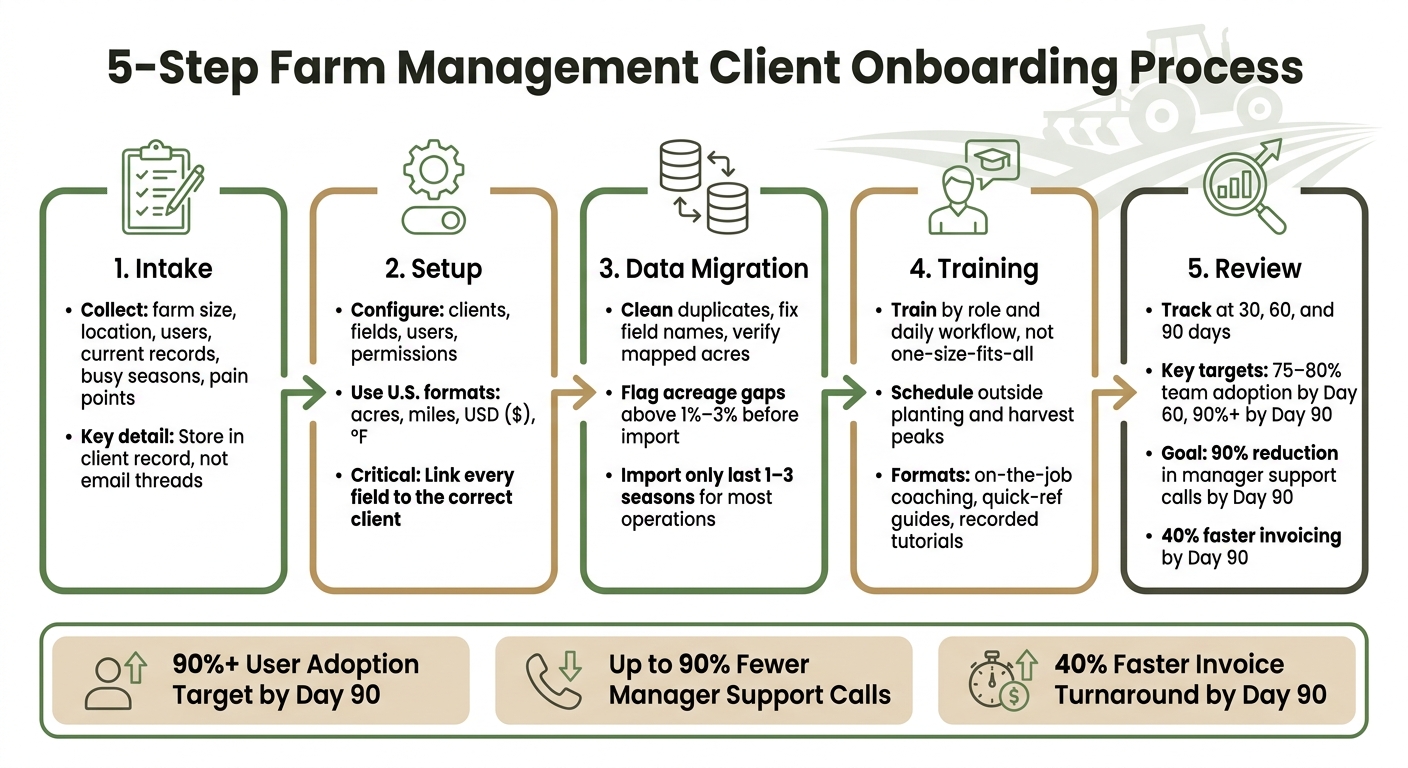
5-Step Farm Management Client Onboarding Process
How to Setup Client, Farm and Field Names | Desktop Training | Trimble Ag Software
Transform Your Agricultural Team
Streamline job management, field mapping, and machine tracking with HarvestYield. Simplify your operations and eliminate paper job sheets.
ContinueQuick Comparison
| Step | Main goal | What I’d watch closely |
|---|---|---|
| 1. Intake | Get setup facts early | Missing users, missing records, bad timing |
| 2. Setup | Build clean account structure | Wrong permissions, wrong field links |
| 3. Data move | Import clean records | Duplicates, unit errors, acreage mismatch |
| 4. Training | Get people using the system | Poor timing, one-size-fits-all training |
| 5. Review | Fix weak spots fast | Low usage, missing job logs, slow invoices |
The core idea is simple: I’d treat onboarding as a repeatable 5-step system, not a one-time setup task. That keeps digital records cleaner, cuts back-and-forth, and gives crews a better shot at using the software during the first season.
Step 1: Standardize Client Intake and Onboarding Preparation
Before you set anything up, gather the facts you need to configure the client the right way. Intake data shapes account setup, user access, and farm structure. Put simply: better intake leads to a cleaner setup.
Build a repeatable intake checklist
Start with a repeatable intake checklist. The goal is simple: collect everything you need before the first login gets created.
At a minimum, your checklist should include:
- Location and size - state, county, and total acres
- Operation type - crop or livestock
- Seasonal workload - key dates and busy periods (MM/DD/YYYY, for example, 04/15/2026)
- Current records - paper, spreadsheets, or another system
- Key pain points - what’s breaking down in the current workflow
- Client goals - what they want to get done
- Weather records - use °F for weather-related data
Once you have that information, store it somewhere the whole team can use without digging through inboxes.
Store intake details in client records
Keep intake details in the client record, not scattered across email threads or random notes. HarvestYield keeps client profiles, farm details, and setup notes in one place, which makes intake easier to track and use.
That matters because these details help you avoid rework during setup and training. Capture the following items during intake:
| Documentation Category | Key Details to Capture | Purpose |
|---|---|---|
| Primary Contact | Name, phone, email | Day-to-day operational coordination |
| Decision-Maker | Name, role, availability | Approvals and onboarding decisions |
| Daily users | Names, roles, digital skill level | Supports onboarding new farm employees and access setup |
| Farm Structure | Total acres, crop or livestock, location | Supports accurate account setup |
| Existing Records | Format (paper/digital), date range, completeness | Helps plan data cleanup and migration |
These records become the starting point for account setup, user access, and farm structure.
Step 2: Configure the Account, Users, and Farm Structure
Once you’ve gathered the intake details, put them into the account the right way. Before you create any jobs, set the local time zone, date format, work hours, acres for field size reporting, miles for distance, USD for billing, and °F for weather-related data. That sounds basic, but it saves a lot of cleanup later.
Start with clients, then add fields. As you go, check that each field is tied to the correct client. In every field record, include:
- Client association
- GPS boundary or location
- Acreage
- Access notes
- Special instructions
Use clear names and color-coding so fields don’t get mixed up across clients. HarvestYield also lets you optionally set a color for the client to help identify its fields during task creation and reporting.
Set up roles, permissions, and team responsibilities
Set up user accounts and roles before anyone logs in for the first time. This keeps people focused on the work they need to do, while limiting access to records they shouldn’t touch. A simple permission model usually works best.
Permission model comparison table
| Permission Level | Primary Users | Key Access Rights | Main Benefit |
|---|---|---|---|
| Administrator | Owners, Partners | Full system access, financial data, pricing, user management. | High protection; requires high trust. |
| Manager/Scheduler | Farm Managers, Lead Hands | Job creation, team tracking, field mapping, report generation. | High efficiency for daily coordination. |
| Office/Billing | Admin Staff, Accountants | Invoicing, client contact records, payment history, job logs. | Protects operational settings; focuses on cash flow. |
| Operator | Full-time Machine Operators | Assigned jobs, GPS navigation, equipment SOPs, job completion. | High efficiency; protects sensitive financial data. |
| Seasonal/Limited | Temporary Crews, Contractors | Specific assigned tasks only, field maps, basic job logging. | Maximum data protection; prevents information overload. |
At this stage, assign crew and equipment responsibility as well. That way, the right operator sees the right job, the right field, and the right machine details.
Link fields, job sheets, and machine logs to the correct client
If a field is linked to the wrong client, every job, report, and invoice tied to that field lands in the wrong place. That’s a small setup error with a big mess behind it.
HarvestYield connects client records directly to scheduled jobs, mapped fields, and machine activity, so work history stays organized from day one. Make sure the mobile job sheets match the client-field links in the database, so field work, machine logs, and invoices stay in sync.
Once the structure is locked, move into field data cleanup and migration.
Step 3: Collect, Clean, and Migrate Farm Data
With your account structure set up, the next move is to import clean, usable data. That means reviewing every source that feeds reporting and planning: paper logs, spreadsheets, exports, maintenance records, job sheets, client lists, and legacy farm software.
The big problems usually show up early: duplicate records and naming mismatches. One field might appear three times under slightly different names. One client might be listed with two spellings. That kind of mess creates problems fast. Clean it up before import, not after. Build one master data dictionary, then align every source to it.
Map fields and verify measurements
After client, field, and machine records are standardized, check field boundaries and acreage. Compare GPS traces or mapped polygons against aerial imagery, survey data, or prior maps. Flag any acreage difference above 1% to 3% for manual review before import.
That step matters more than it might seem. If acreage is wrong, seed, fertilizer, pesticide, labor, and yield reporting can all drift off course.
Use GPS, weather, and machine records to build cleaner data
GPS, weather, and machine records help confirm location, timing, and cost allocation. They give you a second way to check whether the data lines up with what happened in the field. HarvestYield can centralize those records in one workflow.
Once field measurements are verified, decide how much history is worth bringing over.
Historical data migration comparison table
You don't need to migrate everything. In many cases, importing the last 1 to 3 seasons gives you enough context for planning and reporting without forcing you to clean years of messy records. Full historical migration usually makes more sense for larger or more complex operations that need long-term trend analysis, multi-year profitability comparisons, or perennial crop records.
| Full Historical Migration (10+ Years) | Recent Migration (Last 1–3 Seasons) | |
|---|---|---|
| Primary Benefit | Complete long-term performance trends | Fast setup; focuses on current operational needs |
| Drawback | High time investment; often contains outdated or inconsistent data | Missing long-term crop rotation or yield context |
| Recommended Use Case | Large, complex operations with high-value historical data | Standard U.S. farm operations and contractors |
| Data Quality | Often requires significant cleaning and standardization | Easier to verify and map to current field structures |
After import, run test reports for acreage totals, job counts, machine costs, and seasonal totals. If the numbers look off, the problem is usually a field mapping issue, a duplicate record, or a unit conversion error, not the source data itself.
Fix those issues before training starts.
Once the import is clean, move into training and first-season support.
Step 4: Train the Team and Go Live with Early Support
After the data is stable, move from setup to adoption.
Match training to each user's daily workflow
Training should fit the way each person works day to day. A farm manager checking machine costs in the web app needs something different from an operator entering job details in the mobile app from the cab.
Timing matters too. Try to schedule training outside planting and harvest peaks. A post-harvest rollout gives the team more room to settle in before spring planting.
Training format comparison table
| Format | Time Investment | Accessibility for Seasonal Workers | Adoption Effectiveness |
|---|---|---|---|
| Live Workshops | High (45–60 mins) | Low (requires everyone on-site) | Moderate; good for initial buy-in |
| On-the-Job Coaching | Low (10 mins) | High (done in the cab or field) | High; reinforces learning by doing |
| Recorded Tutorials | Very Low (3–5 mins) | High (on-demand on mobile) | Moderate; best as a refresher |
| Quick-Ref Guides | None (post-setup) | Very High (laminated in cab) | High; reduces repeat "how-to" questions |
Once people know the basics, the focus shifts to close monitoring during the first season.
First-season support and monitoring table
Treat the first 60 to 90 days after go-live as a close-support window. This is usually when small misses show up, like skipped job-sheet steps or missing photos, especially around days 30–60.
When that happens, correct it fast with a quick text or phone call. Small course corrections are easier than letting bad habits stick. It also helps to schedule and track your team to monitor weekly jobs and digital completion rates so you can spot drop-offs early.
| Support Method | Responsiveness | Resource Requirements | Fit for Farm Size |
|---|---|---|---|
| Scheduled Check-ins | Proactive | Moderate (manager time) | Best for small teams (5–10 members) |
| Shared Dashboards | Real-time | Low (automated) | Essential for large or multi-state teams |
| Refresher Training | Reactive | Low (short 10-min bursts) | Good for seasonal or high-turnover crews |
| Pilot Advocates | Immediate | Low (peer-based) | Works for all sizes; reduces manager burden |
A simple way to start is with one tech-comfortable pilot user. That person can flag where the process breaks down, what people skip, and where extra help is needed. Then use that feedback to spot adoption gaps for the Step 5 review.
Step 5: Review Adoption, Fix Gaps, and Standardize the Process
Review adoption at 30, 60, and 90 days so you can see what users are doing and where the process starts to fall apart.
Track adoption metrics and usage gaps
Focus on a few core signals: active users, digital job logging, field record completeness, and machine-cost entries. If usage stays steady, adoption is moving in the right direction. If it drops, that usually points to a clear workflow issue.
| KPI to Review | 30-Day Target | 60-Day Target | 90-Day Target |
|---|---|---|---|
| Adoption Rate | Pilot users active; half the team active | 75%–80% of team | 90%+ of team |
| Field Mapping | Top 20–30 fields mapped | 100% of active fields | All fields + access notes |
| Invoice Turnaround | No change expected | 20% faster | 40% faster invoicing |
| Manager Support Calls | Initial setup time | 50% reduction in calls | 90% reduction in calls |
Use the weakest metric to choose the next fix. For example, if machine-cost and fuel entries are missing, make those fields required in the mobile app. If an operator still relies on paper job sheets, move to one-on-one coaching or a buddy system. With HarvestYield, you can see which team members are logging jobs and exactly where gaps show up.
Turn lessons into a standard onboarding playbook
Take what you learn from each review and fold it into the next version of the onboarding process. Write down lessons from each onboarding before they slip away. The best time to do that is right after harvest, when the team still remembers where things got messy.
Then update the intake checklist, setup steps, and training materials. From there, lock in one playbook for intake, setup, training, and support.
| Review Phase | Key Metrics to Track | Standardization Action |
|---|---|---|
| 30 Days | Active users, GPS boundary accuracy | Update intake checklist with missing field details |
| 60 Days | Weekly scheduled vs. completed jobs | Refine quick-reference training cards |
| 90 Days | Invoicing speed, client dispute rate | Finalize the onboarding playbook for next season |
A playbook built from first-season data makes the next client onboarding much more consistent. Store the updated playbook with the client onboarding checklist.
Conclusion: The 5 Steps That Make Client Onboarding Repeatable
A structured onboarding process gives you a system your team can run the same way each time. That means fewer mistakes and better first-season adoption.
Digital records cut admin time and speed invoicing, especially during peak season. There’s one timing rule that helps make that happen: do data entry and training during low-intensity windows, like winter or right after harvest, not during peak planting or harvest. Use that same timing rule for every new client.
And here’s the part that matters day to day: each onboarding should make the next one easier. When intake, setup, training, and review happen in the same order every time, your team spends less time fixing problems and more time doing the work that matters.
FAQs
Who should lead onboarding?
The operations manager or business owner should lead onboarding so the move to digital systems like HarvestYield stays organized and on track.
Start by cleaning up client records, contact details, and field data, then place everything into one clear digital registry. After that, roll things out in phases. Begin with one operator who's comfortable with tech, then expand to the rest of the team.
What data should we migrate first?
To keep the transition smooth, don’t digitize your entire history all at once. Start with the data you need for day-to-day work first:
- Current season activities
- Active field maps and work now in progress
- Field boundaries and access details
- Current equipment and maintenance records from the past two years
- Active client details and service preferences
How do we handle seasonal workers?
Use HarvestYield to give seasonal workers instant digital access to the info they need. That way, they don’t have to memorize farm details or depend on word-of-mouth directions.
On day 1, give them app access to field data, including GPS boundaries and navigation. By day 2, they can check equipment instructions, safety procedures, and client requirements right in the app. By day 3, they can begin working on their own with assigned digital jobs, clear task details, and photo documentation.