Checklist for Choosing Farm Job Scheduling Software
Pick the software your crew can use on a busy farm day - not the one that looks best in a sales demo.
If I were choosing farm job scheduling software, I’d judge it on 4 things first:
- how well it handles job scheduling and tracking
- whether it works on phones and tablets in the field
- whether it keeps job records, costs, and reports in one place
- what it actually costs after setup, support, and extra fees
That matters because small scheduling problems can turn into bigger losses fast: missed jobs, double-booked workers, idle machines, bad records, and billing mistakes. A short trial with your own team is often the best test, especially during planting, spraying, hay, or harvest.
Here’s the short version of what I’d check before buying:
- Your farm’s needs: fields, crops, crews, machines, and peak-season workload
- Job sheet data: field name, operator, machine, start and finish times, acres, fuel, weather, and GPS details
- Core tools: scheduling, reassignment, offline use, mobile access, field maps, and job history search
- Office use: labor logs, machine costs, exports, billing and invoicing, and data access
- Price: monthly fees, user fees, acreage fees, setup, training, support, and export charges
- Trial results: how the software holds up during normal work and bad-signal days
One option named in the article is HarvestYield, with support for scheduling, GPS-linked job records, weather data, paperless job sheets, field mapping, and offline use.
Unlocking the power of farm management software
Transform Your Agricultural Team
Streamline job management, field mapping, and machine tracking with HarvestYield. Simplify your operations and eliminate paper job sheets.
ContinueQuick comparison
| What to check | What I’d look for |
|---|---|
| Scheduling | Can I assign and reassign jobs fast by field, crew, date, or machine? |
| Mobile use | Does it work well on iPhone, Android, and tablets in the field? |
| Offline mode | Can crews keep working with weak or no signal, then sync later? |
| Field records | Does each job log time, acres, machine use, inputs, weather, and GPS? |
| Search and history | Can I find last season’s work by field, client, worker, or machine? |
| Reports and costs | Can I track labor hours, machine hours, acres, and machine costs? |
| Exports | Can I export to CSV, Excel, PDF, or SHP without extra hassle? |
| Total cost | What will it cost per month in $, plus setup and support? |
| Trial score | Did it work for my team during an actual busy week? |
If I had to reduce the full article to one rule, it would be this: score each option with a 100-point checklist, then let daily ease of use break the tie.
Step 1: Define Your Farm's Scheduling and Record-Keeping Needs
Before you compare features, get clear on what your farm needs to schedule and track. Fields, crops, crews, seasons, and machines all shape the right software choice. A tool that looks good on paper can still fall apart when your busiest weeks hit.
Start with your peak season. That gives you the best stress test for how much work the software needs to handle.
List the Jobs, Crews, and Seasonal Work You Need to Schedule
Map out your year of field work by field, crop, crew, season, and machine. If workers and equipment need to be booked together, note that too. That kind of overlap matters fast once the season gets busy.
It also helps to write down the most crowded stretch of your year. Think planting, spraying, hay, harvest, or any other period when everything seems to happen at once. Use that window to judge whether the software can keep up with your scheduling load.
Define the Data You Need on Every Job Sheet
Once you know what needs to be scheduled, pin down the details each job record should capture. This is where a lot of farms either overbuild or miss key data.
Stick with the fields your team will use every day. If a field won't help with payroll, job tracking, machine use, compliance, or field history, it may just slow people down.
| Job Sheet Data Category | Specific Metrics to Capture |
|---|---|
| Location | Field name, client name, GPS boundaries, access notes |
| Work Details | Activity type, machine used, operator name, implements |
| Timing and Output | Start/finish times, total duration, acres worked, miles traveled |
| Inputs and Output | Quantity of liquid or dry materials (gallons/lbs), number of bales, fuel used |
| Weather | Temperature (°F), wind speed and direction, humidity, precipitation |
Once your must-have fields are set, move on to scheduling, mobile access, and field visibility.
Step 2: Check Core Features for Scheduling, Mobile Use, and Field Visibility
Once you’ve nailed down what your job sheets need to do, it’s time to see the software in action during a live demo.
Confirm the Software Can Schedule Jobs Clearly and Reassign Them Quickly
Ask the vendor to show how the system handles day-to-day scheduling. Can you create, view, and reassign jobs fast by date, crew, field, or machine? And just as important, can you spot conflicts, overlaps, or missed work at a glance?
That matters more than it sounds. A schedule can have all the data in the world, but if it’s hard to read, it slows everyone down.
Check Mobile Apps, Offline Use, GPS, and Field Mapping
Field software has to work where the work happens: in trucks, on tractors, and out in the field. Make sure workers and supervisors can use it well on phones or tablets. That includes offline access, GPS location, field maps, and weather details tied to each job.
HarvestYield supports job scheduling, GPS-based job tracking, automatic weather data integration, field mapping and measuring, and iOS, Android, and web access. This helps you go paperless on your farm and delays between the field and the office.
Then check one more thing: does the same data show up in the office without anyone having to type it in again? Don’t just take their word for it. Test offline mode in your own fields.
Make Sure Job History Is Easy to Search by Field, Client, Worker, or Machine
Finished jobs only help you later if you can pull them up fast. Past work should be easy to find by field, client, worker, crop, date, or equipment, without digging through old records.
During the demo, ask the vendor to find a last-season job using only a field name or machine. That’s a simple test, and it tells you a lot.
Look for field history views that show a chronological record of work on each field, such as spraying, planting, and harvesting. Machine logs should also track repairs, service, and refueling in the same system.
After that, check whether those records feed into reporting, costs, and exports.
Step 3: Review Reporting, Costs, Integrations, and Pricing
Good scheduling software should do more than log field work. It should turn that work into reports, exports, and cost data your office can use.
Once jobs are recorded the right way in the field, the next step is simple: can that same data flow into reporting, exports, and cost tracking without retyping anything? That’s what this step is about. You’re checking whether field data turns into office data that’s ready to use.
Check Reporting, Labor Logs, and Machine Cost Tracking
If job sheets are already being recorded in the field, the next thing to check is reporting.
You want reports that show labor hours, acres covered, machine hours, and machine costs in a way that helps you make decisions. That usually means being able to sort or break out data by:
- worker
- crew
- field
- client
- machine
If you need profit numbers by field, client, crew, or machine, make sure the software can slice the data that way. A tool might look good on the surface, but if all your numbers are stuck in one big summary, it won’t help much when it’s time to answer basic business questions.
Check Exports, Office Workflow, and Data Ownership
Reporting is one part of the picture. The other part is movement: can your data get into the rest of your workflow cleanly?
Check whether the system exports to CSV, Excel, PDF, and SHP files. Those formats matter if your team handles billing, payroll, or GIS work outside the scheduling app.
It’s also smart to confirm that you can export your data whenever you want and keep it in formats you can still use later. That matters more than many teams think. If your records are stuck in one system, switching tools or sharing data with your office can turn into a headache fast.
Calculate the Real Cost for Your Team
Don’t stop at the monthly price.
Look at the full cost for your team, including:
- user or acreage fees
- setup
- training
- support
- export costs
A platform can seem low-cost at first, then get expensive once you add the pieces you need to run it day to day. The goal here is to see the actual cost, not just the price on the sales page.
Step 4: Run a Short Trial and Score Each Option
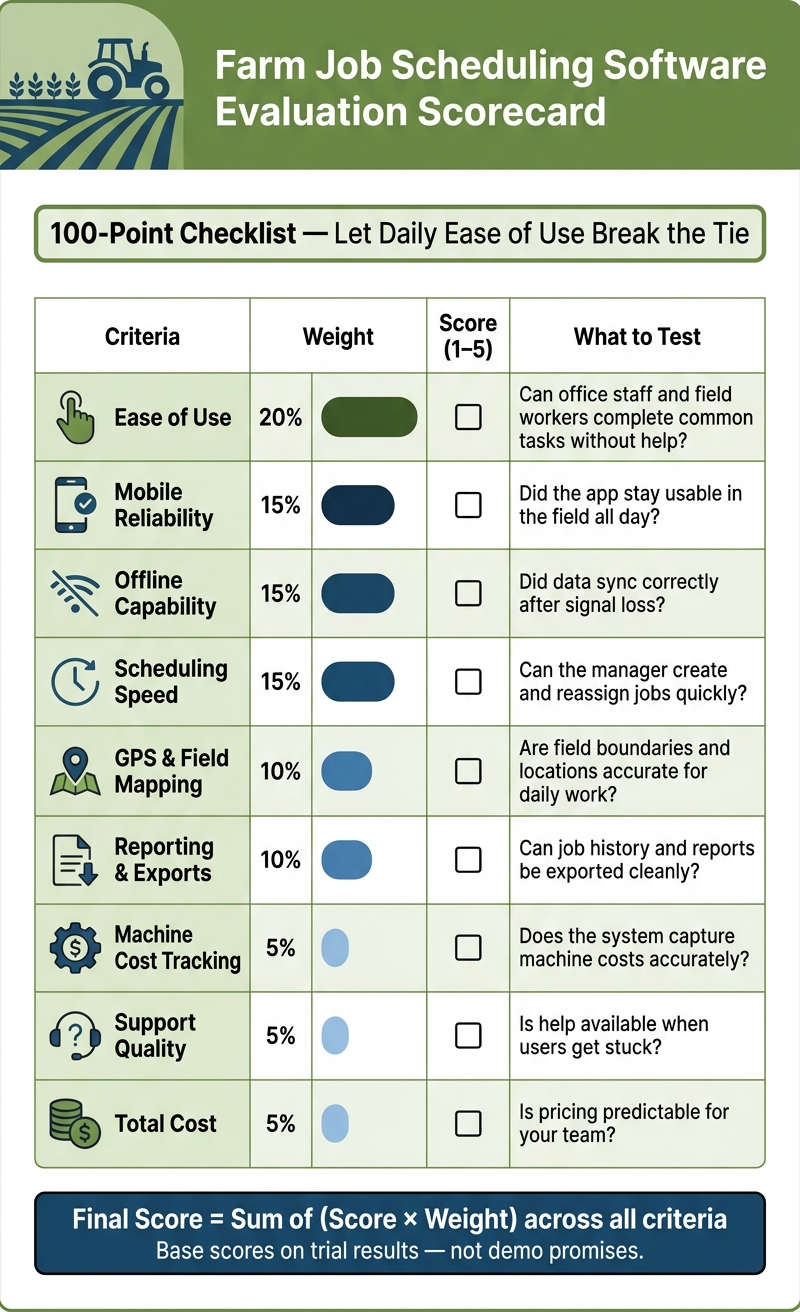
Farm Job Scheduling Software Evaluation Scorecard
Once you've looked at pricing and reporting, put each option through a short trial before you decide.
Test It During Actual Workdays, Not a Controlled Demo
Run the trial during a busy week with your actual crews, fields, and machines. Let office staff and field operators use the system from start to finish.
The pilot should cover normal day-to-day work, plus a few disruptions. Add a last-minute crew reassignment, a weather delay, a machine swap, and at least one day with weak or no connectivity. Also test end-of-day job closeout.
If you use HarvestYield, check GPS-linked job records, automatic weather capture, and paperless syncing.
At the end of each day, ask your team what slowed them down, what they had to do twice, and whether they needed help to finish a job. That feedback gives you a much better side-by-side comparison than a polished sales demo ever will.
Score Each Option Against Your Must-Have Checklist
Now score each option against the must-haves from Step 1. Use a simple weighted scorecard based on the priorities you set there. Give more weight to the issues that hurt your day most. If your crews often work where there's no signal, for example, offline capability should matter more than advanced reporting.
A simple setup works well: assign 100 total points across your criteria, then score each option from 1 to 5 and multiply by the weight.
| Criteria | Weight | Score (1–5) | Notes |
|---|---|---|---|
| Ease of Use | 20% | Can office staff and field workers complete common tasks without help? | |
| Mobile Reliability | 15% | Did the app stay usable in the field all day? | |
| Offline Capability | 15% | Did data sync correctly after signal loss? | |
| Scheduling Speed | 15% | Can the manager create and reassign jobs quickly? | |
| GPS & Field Mapping | 10% | Are field boundaries and locations accurate enough for daily work? | |
| Reporting & Exports | 10% | Can job history and reports be exported cleanly? | |
| Machine Cost Tracking | 5% | Does the system capture machine costs accurately? | |
| Support Quality | 5% | Is help available when users get stuck? | |
| Total Cost | 5% | Is pricing predictable for your team? |
Base your scoring on what happened in the trial, not on what the demo promised. Multiply each score by its weight, then total the points.
Conclusion: Choose the Software That Fits Your Farm's Daily Work
The right scheduling software should match the way your farm runs every day, not just the way it looks in a polished demo.
So keep the checklist simple and use it in this order: define your needs, confirm field-ready features, look at reporting and costs, then test the software during actual work.
Put more weight on the criteria that matter most for your operation. After you score each option, daily usability should be the tie-breaker. Pick the system your crew will use on a steady basis. HarvestYield can support GPS tracking and offline use.
If you get that choice right, you should see day-to-day gains you can measure: fewer manual errors, clearer crew visibility, and job records you can count on.
FAQs
How long should I test farm scheduling software before buying?
Test farm scheduling software for at least 30 days so you can see how it works in day-to-day farm life.
A simple way to handle the trial is to start by using it yourself during the first week. In the second week, pilot it with one operator. Then spend the rest of the trial training your team and watching how the software performs in the field and in daily planning.
HarvestYield offers a 30-day free trial, which lets you evaluate it without any financial commitment.
What job data is most important to track on each field job?
Track the field and client, job type, start and finish times, crew or operator, and the equipment used.
Also log quantities and rates, GPS coverage, weather data, and any special instructions or delays. That gives you a clear record of where and when the work happened. It also helps with cost tracking, accountability, and faster scheduling decisions.
How can I tell if the total software cost will stay predictable?
Look for clear upfront pricing and a subscription plan that covers updates, support, cloud, and mobile access. That way, you can stick to a steady monthly rate instead of getting hit with surprise charges later.
It also helps to check that the plan matches your expected team size before peak season. And make sure you separate one-time setup costs, like field mapping and team setup, from the monthly subscription fee.
HarvestYield’s free trial can help you test whether it’s a good fit before you commit.